
Did you again get stuck with a new thing that you feel seems silly? Don’t worry you have a genuine doubt.
It is actually not simple to transfer the Amazon Pay balance to a bank account. It looks simple superficially but it needs a lot of verifications to be completed. But now you are at the right place. This article contains all the necessary information on how to transfer amazon pay balance to bank account. So here we go with the information.
Table of Contents
About Amazon Pay
First of all, here is something that you must know before trying to transfer your Amazon Pay balance to your bank account.
There are two types of balances in the Amazon Pay wallet.
- Cashbacks that you earn after lots of payments
- Money that you add to the wallet
The cashback that you earn on the app can not be transferred to your bank account. It can just be used while shopping on amazon or while using Amazon Pay to recharge or pay bills. But the money that you transfer to the Amazon Pay wallet can be transferred to your bank account and the process is as given below in the article.
How to Transfer Amazon Pay Balance to Bank Account
Step 1: Open the Amazon app.
Step 2: Select “Send Money”.

Step 3: Click on “To Bank”. The following interface will appear.
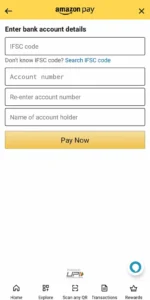
Step 4: Fill in the information of your bank account and click on “Pay now”.
Step 5: Enter the amount and click on continue.
Step 6: The following interface will appear.
Click on “Show more ways to pay”.
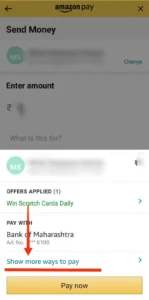
Step 7: “Amazon Pay balance” option will appear. Select the option. And click on “Continue”.
Step 8: Enter your PIN and the amount will be transferred.
Alert: You might get stuck after step 7 because to transfer Amazon Pay balance money to bank account you need to have a verified Amazon account. To have a verified Amazon account you complete KYC.
How to do KYC for Amazon Pay Balance
Step 1: Go to Amazon Pay.
Step 2: Scroll down. You will see the “manage” tab.
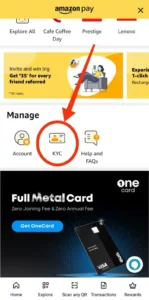
In the manage tab there is a “KYC” option, click on it. They will take you to the next page. Here click on ”Upload documents now”.
The next page will appear as given below.
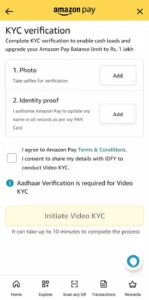
Step 3:To complete KYC you have to upload “a selfie”
Step 4: Upload a picture of your PAN document
Step 5: Click on the “I agree to Amazon Pay terms and conditions”. Now, click on “Initiate Video KYC”.
Step 6: Here they will ask to enable location. “On the GPS” so that the app access your location for KYC.
The following interface will appear.

Step 7: Enter your Aadhar number, enter the captcha and click on “next”.
Step 8: You will receive an OTP on your mobile number which is linked to your aadhar card. Enter the OTP.
Step 9: Select the language as per your convenience and initiate video conferencing.
The process is simple, it will take just 10 minutes and your KYC will be completed and your account will be upgraded to a full KYC account.
Note: In step 8 of KYC completion OTP will be received on the mobile number which is linked to your aadhar card.
If the mobile number linked Amazon Pay account and aadhar card is not the same then you will have to change the number linked to either one of the two. If the mobile number linked to your aadhar card is still your parent’s number you will have to update your aadhar card details.
All the information given above will answer maximum of your queries on how to transfer amazon pay balance to bank account. And hope you will be able to transfer the money easily. But in case you find any other query you can contact Amazon Pay customer care service. They have very organized service for customer care, your doubt will definitely get solved there.