Facebook Messenger is a widely-used instant messaging app, allowing users to stay connected with friends and family. However, if you have decided to take a break from Messenger, you can easily deactivate your account. In this article, we will explain the step-by-step process for deactivating your Facebook Messenger account. After deactivating, your profile and conversations will no longer be accessible to others. It is important to note that deactivating Messenger does not deactivate your Facebook account, which must be done separately. Read on to learn how to deactivate your Facebook Messenger account.
Table of Contents
Deactivate account from Messenger
Here are the steps to deactivate your Facebook Messenger account:
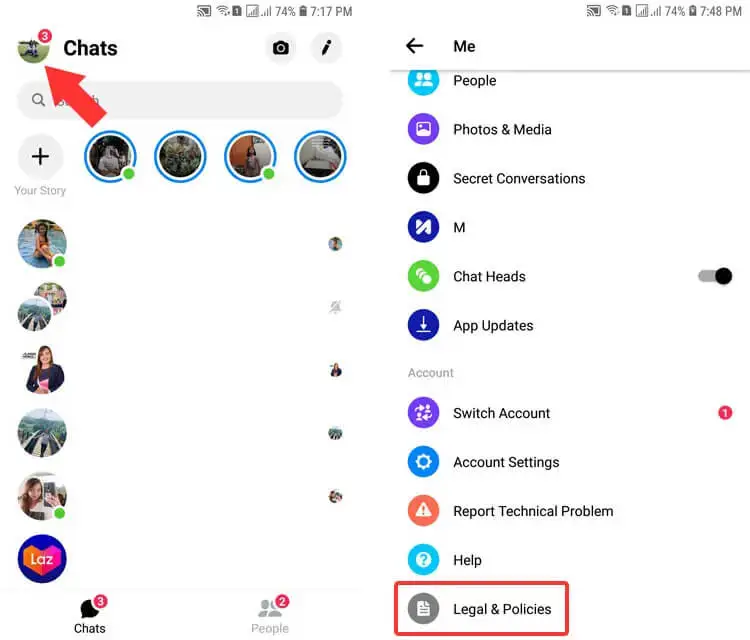
- Open the Facebook Messenger app on your phone or log in to the Messenger website on your computer.
- Tap on your profile picture or click on your name in the top left corner to access your profile.
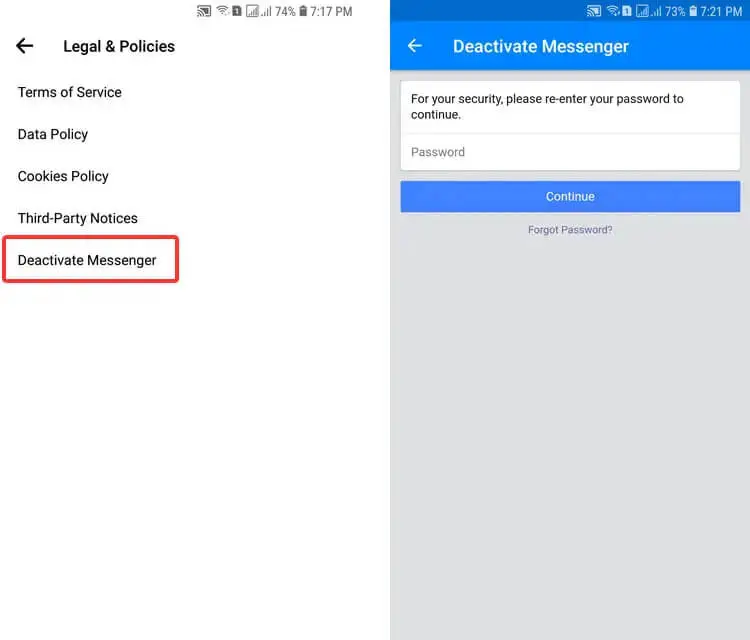
- Select “Legal & Policies” from the list of options.
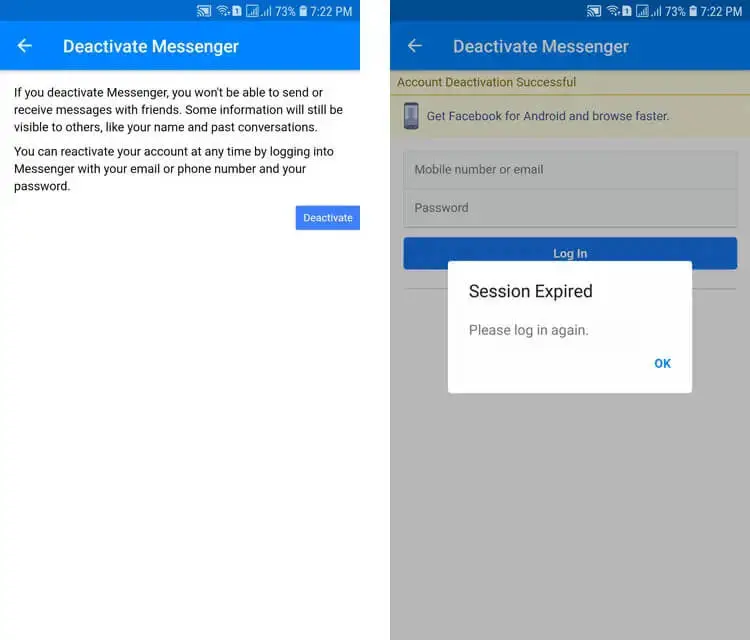
- Tap or click on “Deactivate.”
- Follow the on-screen instructions to deactivate your Messenger account. You’ll be asked to confirm the deactivation and specify a reason for leaving.
- Once you’ve confirmed the deactivation, your Messenger account will be disabled, and your profile and conversations will no longer be accessible to others.


Deactivate Messenger account temporarily
Unfortunately, Facebook does not currently offer a temporary deactivation option for Messenger accounts. When you deactivate your Messenger account, it will be disabled, and your profile and conversations will no longer be accessible to others until you reactivate it. If you need a break from Messenger, it’s best to deactivate your account and then reactivate it when you’re ready to start using the app again.
Deactivate Messenger Account in iPhone
- Open the Facebook Messenger app on your iPhone.
- Tap on your profile picture in the top left corner.
- Select “Legal & Policies” from the list of options.
- Tap or click on “Deactivate.”
- Follow the on-screen instructions to deactivate your Messenger account. You’ll be asked to confirm the deactivation and specify a reason for leaving.
- Once you’ve confirmed the deactivation, your Messenger account will be disabled, and your profile and conversations will no longer be accessible to others.
Note: Deactivating your Messenger account does not deactivate your Facebook account. To deactivate your Facebook account, you must log in to Facebook on a web browser and follow the steps to deactivate your Facebook account.
Deactivate Messenger Account in PC
- Install Messenger application on your PC.
- Log in to your account using your Facebook credentials.
- Click on your profile picture in the top left corner.
- Select “Legal & Policies” from the drop-down menu.
- Click on “Deactivate.”
- Follow the on-screen instructions to deactivate your Messenger account. You’ll be asked to confirm the deactivation and specify a reason for leaving.
- Once you’ve confirmed the deactivation, your Messenger account will be disabled, and your profile and conversations will no longer be accessible to others.
In conclusion, deactivating your Facebook Messenger account can be a useful way to take a break from the platform or to permanently delete your account and data. The process of deactivating your Messenger account is straightforward and can be done from either your phone or computer. Whether you choose to deactivate your Messenger account temporarily or permanently, it is important to consider the implications of this action, including the deletion of your conversations and contacts, and the fact that deactivating your Messenger account does not deactivate your Facebook account. If you’re unsure whether deactivating your Messenger account is the right choice for you, it may be helpful to take some time to reflect on your use of the platform and to consider other alternatives, such as adjusting your privacy settings or taking a break from the platform for a set period of time. Regardless of your decision, it is important to understand your options and to make an informed choice about your online presence.


