
Microsoft Word is a widely-used word processing software that is part of the Microsoft Office suite. It is designed to help users create and edit text-based documents, such as letters, reports, and resumes. Word provides a range of features that make it easy to create professional-looking documents, including pre-designed templates, font and paragraph formatting options, and tools for inserting images, tables, and other multimedia elements.
Word’s intuitive user interface and versatile toolset make it an ideal choice for a wide range of users, from students and home users to business professionals and writers. Whether you need to create simple documents or complex reports, Word has the tools you need to get the job done. Additionally, Word documents can be saved and shared with others, making it easy to collaborate on projects and share information with others.
In short, Microsoft Word is a powerful word processing software that provides users with a range of features for creating and editing text-based documents. Whether you are working on a school project, writing a business report, or simply creating a letter to a friend, Word has everything you need to get the job done.
In Microsoft Word, a border is a line that surrounds and frames a text or an object. Borders can improve the visual appeal of a document by adding emphasis to certain elements or separating content. This article will guide you through the process of adding a border to your text, objects, and tables in Word, as well as provide tips on customizing the border to your specific needs. Whether you are a beginner or an experienced Word user, you will find this article helpful in adding borders to your documents.
Table of Contents
Add border in MS Word
Here is a step-by-step guide on how to add a border in Word:
- Open the MS Word document to which you want to add a border
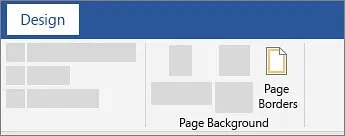
- Go to Design the tab and select the “Page Borders” option on the top right corner
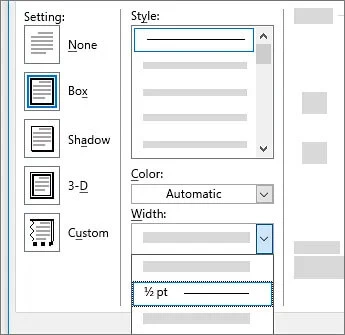
- Under Setting, select any of the options – “Box”, “Shadow”, “3D”, “Custom”
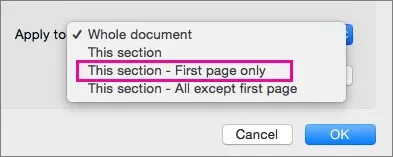
- If you are happy with the preview, under Apply to option, select options select the whole document if you want to add a border to the whole document (you can also choose this section, this section – First page only, and This section – All except this page options)
- Once you have made the selection, click OK
Once you have done this, the border which you have selected will be applied to your document
Add border in MS Word on mobile
To add a border in Microsoft Word on mobile, follow these steps:
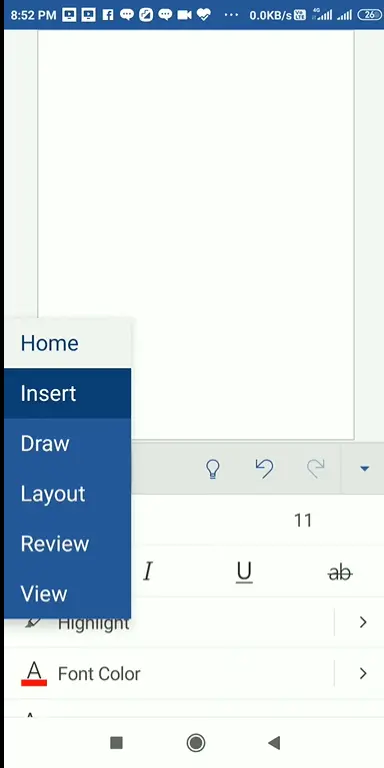
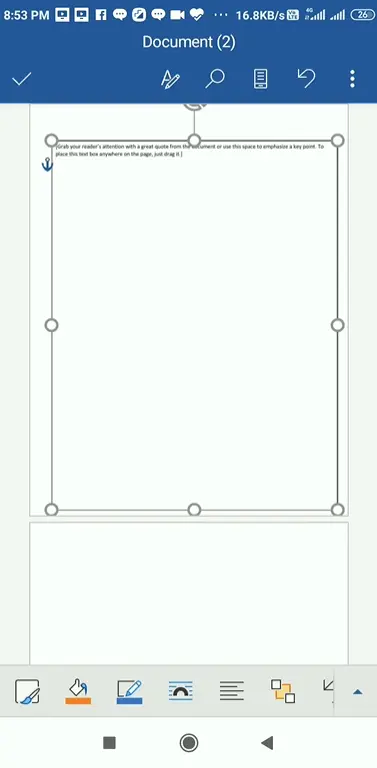
- Open the Word document on your mobile device and tap on the text or object you want to add the border to.
- Tap on the “Insert” option.
- Select “Text box” in the insert menu.
- Drag according to the page size as per required.

With these steps, you can easily add a border to your text or objects in Microsoft Word on mobile, giving your document a polished and professional look. The mobile app provides a range of border options, making it easy to add visual interest to your documents, no matter where you are.
Add custom border in Word
To add a custom border in Microsoft Word, follow these steps:
- Open the MS Word document to which you want to add a border
- Go to Design the tab and select the “Page Borders” option on the top right corner
- Under the Page Border tab, select the “Custom” option
- Now, you can customize the Style, Color, Width, and Art, check the preview
- If you are happy with the preview, under Apply to option where all you want to apply this border for
- Click OK

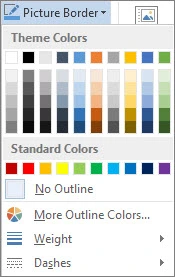
Add border to image in Word
To add a border to an image in Microsoft Word, follow these steps:
- Choose the image that you want to add a border to.
- On the Picture Format tab, in the Pictures Styles gallery, choose a style.

- Go to Picture Format > Picture Border.
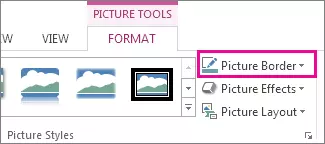
- Choose a color.
In addition to the simple steps outlined in the previous response, it is worth noting that the process of adding a border in Microsoft Word is flexible and customizable. Depending on the version of the software you are using, you will have a range of options to choose from when it comes to border style, color, and thickness. For example, you may have the option to choose from a variety of line styles, such as solid, dotted, or dashed lines, or you may be able to add a custom border design using your own graphics or images.
Another important aspect to consider when adding a border in Word is the type of object or text you want to add the border to. For example, you may want to add a border to a specific section of text, or you may want to add a border to a table, a picture, or a page. Depending on the type of object you are working with, the steps involved in adding a border may vary slightly.
Finally, it is worth mentioning that the process of adding a border in Word is part of the larger process of formatting and styling your document. By adding borders, you can create visual interest, reinforce the structure of your document, and provide a clear and defined look that helps your reader focus on the information you are presenting. Whether you are creating a professional report, a school assignment, or a personal letter, adding a border can help you achieve a polished and professional result.